
From the following guide you will learn how to configure maven project to work with Spock Testing Framework in both cases: standard Java maven project and SpringBoot maven project.
Watch this tutorial on YouTube
Table of content
- Resources
- Watch this tutorial on YouTube
- Configuring pom.xml in a Java project to work with Spock 2.x
- Configuring pom.xml in a SpringBoot project to work with Spock 2.x
Resources
Configuring pom.xml in a Java project to work with Spock 2.x
To setup Spock 2.X in maven project, just add spock-core dependency as it is shown below and add the following plugins:
gmavenplus-plugin – responsible for compiling groovy classes
maven-surefire-plugin – responsible for running unit tests in maven’s test phase.
<?xml version="1.0" encoding="UTF-8"?>
<project xmlns="http://maven.apache.org/POM/4.0.0"
         xmlns:xsi="http://www.w3.org/2001/XMLSchema-instance"
         xsi:schemaLocation="http://maven.apache.org/POM/4.0.0 http://maven.apache.org/xsd/maven-4.0.0.xsd">
    <modelVersion>4.0.0</modelVersion>

    <groupId>com.bettercoding.com</groupId>
    <artifactId>spock-mocking-example</artifactId>
    <version>1.0-SNAPSHOT</version>

    <properties>
        <maven.compiler.source>17</maven.compiler.source>
        <maven.compiler.target>17</maven.compiler.target>
    </properties>

   <dependencies>
       <dependency>
           <groupId>org.spockframework</groupId>
           <artifactId>spock-core</artifactId>
           <version>2.1-groovy-3.0</version>
           <scope>test</scope>
       </dependency>
   </dependencies>

    <build>
        <plugins>
            <plugin>
                <groupId>org.codehaus.gmavenplus</groupId>
                <artifactId>gmavenplus-plugin</artifactId>
                <version>1.13.1</version>
                <executions>
                    <execution>
                        <goals>
                            <goal>compileTests</goal>
                        </goals>
                    </execution>
                </executions>
            </plugin>
            <plugin>
                <groupId>org.apache.maven.plugins</groupId>
                <artifactId>maven-surefire-plugin</artifactId>
                <version>3.0.0-M6</version>
            </plugin>
        </plugins>
    </build>
</project>
Creating sample Spock test
If you are adding a Spock test for the first it might me necessary to create src/test/groovy directory as it’s show below. If you use Intellij Idea you need to refresh maven project to get the created directory marked as TestSource(green colour).
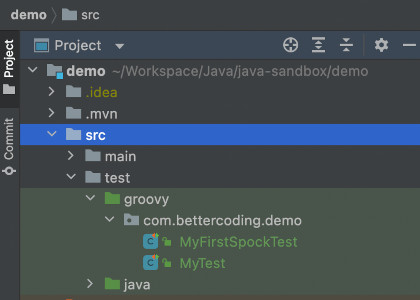
Create groovy test class that extends spock.lang.Specification. Please remember to name your test class as *Test.groovy to be run by maven-surefire-plugin in maven test phase. In other case you have to configure maven-surefire-plugin to include custom classname pattern.
import spock.lang.Specification

class MyFirstSpockTest extends Specification {
  def "My First Spock test"() {
    when:
      def dummy = 1
    then:
      dummy == 1
  }
}
Configuring pom.xml in a SpringBoot project to work with Spock 2.x
To setup Spock 2.X Framework working together with SpringBoot just add spock-core and spock-spring dependencies. It’s also important to ensure that spring-boot-starter-test dependency is also added.
The last part od the setup is to add and configure the following plugins:
- gmavenplus-plugin – responsible for compiling groovy classes
- maven-surefire-plugin – responsible for running unit tests in maven’s test phase.
<?xml version="1.0" encoding="UTF-8"?>
<project xmlns="http://maven.apache.org/POM/4.0.0" xmlns:xsi="http://www.w3.org/2001/XMLSchema-instance"
         xsi:schemaLocation="http://maven.apache.org/POM/4.0.0 https://maven.apache.org/xsd/maven-4.0.0.xsd">
    <modelVersion>4.0.0</modelVersion>
    <parent>
        <groupId>org.springframework.boot</groupId>
        <artifactId>spring-boot-starter-parent</artifactId>
        <version>2.6.7</version>
        <relativePath/> <!-- lookup parent from repository -->
    </parent>
    <groupId>com.bettercoding</groupId>
    <artifactId>demo</artifactId>
    <version>0.0.1-SNAPSHOT</version>
    <name>demo</name>
    <description>Demo project for Spring Boot</description>
    <properties>
        <java.version>17</java.version>
        <spock.version>2.1-groovy-3.0</spock.version>
    </properties>
    <dependencies>
        <dependency>
            <groupId>org.spockframework</groupId>
            <artifactId>spock-core</artifactId>
            <version>${spock.version}</version>
            <scope>test</scope>
        </dependency>
        <dependency>
            <groupId>org.spockframework</groupId>
            <artifactId>spock-spring</artifactId>
            <version>${spock.version}</version>
            <scope>test</scope>
        </dependency>
        <dependency>
            <groupId>org.springframework.boot</groupId>
            <artifactId>spring-boot-starter</artifactId>
        </dependency>

        <dependency>
            <groupId>org.springframework.boot</groupId>
            <artifactId>spring-boot-starter-test</artifactId>
            <scope>test</scope>
        </dependency>
    </dependencies>

    <build>
        <plugins>
            <plugin>
                <groupId>org.springframework.boot</groupId>
                <artifactId>spring-boot-maven-plugin</artifactId>
            </plugin>
            <plugin>
                <groupId>org.codehaus.gmavenplus</groupId>
                <artifactId>gmavenplus-plugin</artifactId>
                <version>1.13.1</version>
                <executions>
                    <execution>
                        <goals>
                            <goal>compileTests</goal>
                        </goals>
                    </execution>
                </executions>
            </plugin>
            <plugin>
                <groupId>org.apache.maven.plugins</groupId>
                <artifactId>maven-surefire-plugin</artifactId>
                <version>3.0.0-M6</version>
            </plugin>
        </plugins>
    </build>

</project>
Creating our first @SpringBootTest
If you are adding a Spock test for the first it might me necessary to create src/test/groovy directory as it’s show below. If you use Intellij Idea you need to refresh maven project to get the created directory marked as TestSource(green colour).
Create groovy test class that extends spock.lang.Specification. Please remember to name your test class as *Test.groovy to be run by maven-surefire-plugin in maven test phase. In other case you have to configure maven-surefire-plugin to include custom classname pattern. Annotate the test by @SpringBootTest.
import org.springframework.beans.factory.annotation.Autowired
import org.springframework.boot.test.context.SpringBootTest
import org.springframework.context.ApplicationContext
import spock.lang.Specification

@SpringBootTest
class MyTest extends Specification {

  @Autowired
  private ApplicationContext applicationContext;

  def "SpringBoot test"() {
    expect:
      applicationContext != null

  }
}
That’s all what I’ve prepared for you in this tutorial, if I helped you, please consider sharing this post to help me gain a wider audience.
Thanks and I hope to see you in my next tutorial.